
Ruby on rails Cloudflare turnstile tutorial
Context: Why Turnstile For Business?

A client asked for help because he was targeted by a bot that would sign up with “legit” google emails.
This was critical for the business because these emails would end up in the marketing email system.
When new marketing emails were sent, some would get rejected, causing the business’s domain to lose authority and making new email campaigns less effective.
Ultimately, this would harm the business by reducing conversions rates and making any diagnosis unclear in Stripe dashboards.
What tripped him up was the reason for the email server rejection: “Inbox full”.
This probably means that the hacker had a database of “clean” emails that were used in many attacks, leading to the inboxes being filled.
We were considering three options:
- Fail2Ban
- Captcha
- Cloudflare Turnstile
In our case, Fail2Ban was not an option since it was not the same email or IP that was abusing us.
Captcha is nice, but Cloudflare Turnstile is free.
Also, this might be just personal, but I can’t stand failing Captcha anymore…
I personally end up trusting websites that have turnstiles more than captcha.
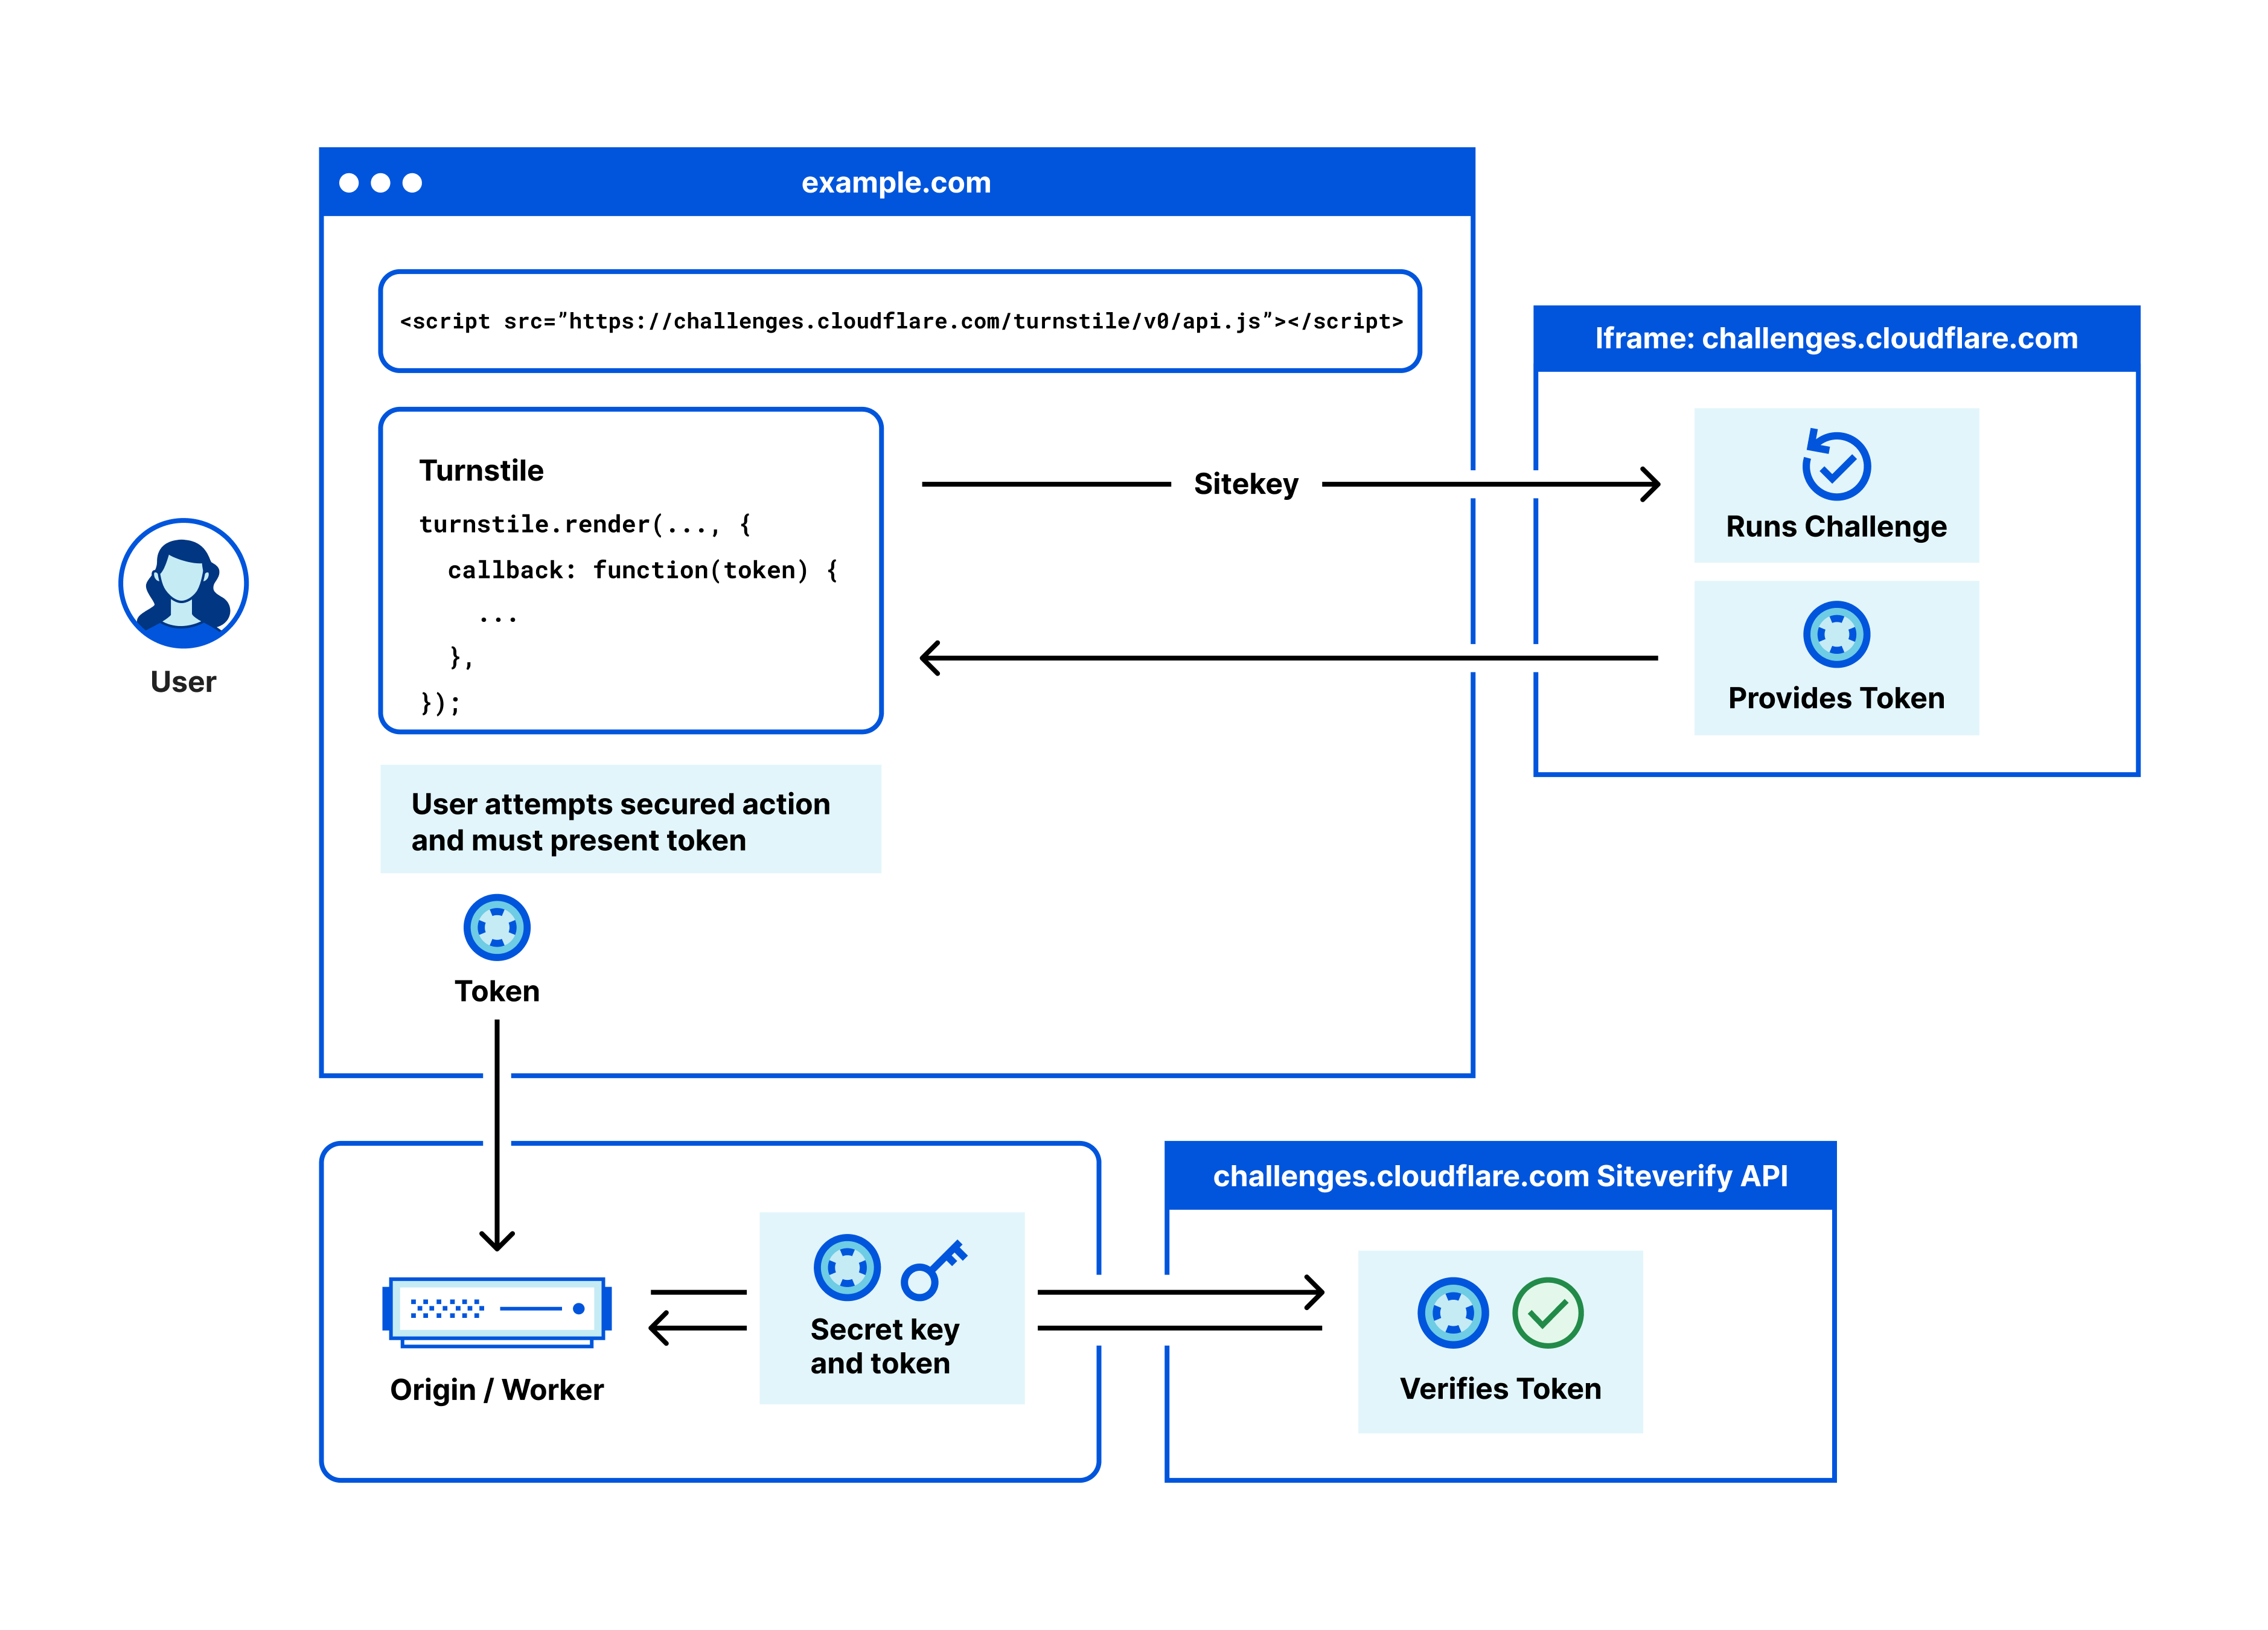
How does tunrstile works?
In simple words:
- Get your private and public keys.
- Add a script to your browser.
- The script will look for a specific class in your document.
- Render the widget.
- The widget will fetch the Cloudflare API to get a signed token using the public key.
- Insert the signed token in the form so that it’s present when the user submits the form.
- The user clicks the submit button and in your controller, you make an additional request to check the token submitted with a private key.
- If the challenge passes, you proceed with the action, else you send the cops.
In one image:
Implementation
Create your credentials
Create your account if none, log-in and create your site:

Then just leave everyting to default and add your site name and domain.
These are your keys:

Now just invest 10 minutes in the cloudflares docs:
Adding the JS
Simple, add in app/views/layouts/application.html in the head tag:
<%= javascript_include_tag "https://challenges.cloudflare.com/turnstile/v0/api.js", "data-turbo-track": "reload", defer: true %>
Protect your form
In your form, add this HTML with the data-sitekey:
<div class="cf-turnstile mb-3" data-controller="cloudflare-turnstile" data-sitekey="<%= Rails.application.credentials.dig(:cloudflare_turnstile, :public_key) %>" data-callback="cloudflareTurnstileCallback"></div>
Render the widget with turbo
// /app/javascript/controllers/cloudflare_turnstile_controller.js

import { Controller } from "@hotwired/stimulus"

// Connects to data-controller="cloudflare-turnstile"
export default class extends Controller {
  connect() {
    // window.turnstile is available thanks to the js script you added in the head.
    if (document.querySelector('.cf-turnstile') && window.turnstile) {
      window.turnstile.render(".cf-turnstile")
    }
  }
}
This will allow you to keep the turnstile widget alive on page navigations.
Keep an eye on the data-callback for later ;)
Validate the token
Now, once the user clicks on the checkbox of the widget, it will insert a token that needs to be validated in the action that our form is targeting.
In our case, it’s the sign-up form in Devise, which is this controller:
# app/controllers/users/registrations_controller.rb
module Users
  class RegistrationsController < Devise::RegistrationsController
    prepend_before_action :validate_cloudflare_turnstile, only: :create

    # Your controller logic

    def validate_cloudflare_turnstile
      validation = TurnstileVerifier.check(params[:"cf-turnstile-response"], request.remote_ip)
      return if validation

      # If validation fails, we set our resource since this code is executed
      # in a `prepend_before_action`
      self.resource = resource_class.new sign_up_params
      resource.validate
      set_minimum_password_length
      respond_with_navigational(resource) { render :new }
    end
  end
end
NOTE: To have the class above in your app, you need to to the following:
Execute this command:
rails g device:controllers users -c=registrations
In your routes, add:
devise_for :users, controllers: { registrations: 'users/registrations' }
# app/models/turnstile_verifier.rb
require "net/http"

class TurnstileVerifier
  PRIVATE_KEY = Rails.application.credentials.dig(:cloudflare_turnstile, :private_key)

  # Catch relevant network errors only.
  NETWORK_ERRORS = [Errno::ETIMEDOUT]

  # Set max retries here.
  MAX_RETRIES = 3

  # Syntactic sugar syntax to avoid initialization in the controller
  def self.check(payload, client_ip)
    new(payload, client_ip).check
  end

  def initialize(payload, client_ip)
    @payload = payload
    @client_ip = client_ip
  end

  def check
    return false unless @payload
    result = request_verification
    result["success"]
  end

  private

  def request_verification
    attempts ||= 0
    verification_url = URI("https://challenges.cloudflare.com/turnstile/v0/siteverify")

    response = Net::HTTP.post_form(verification_url,
      secret: PRIVATE_KEY,
      response: @payload,
      remoteip: @client_ip
    )

    JSON.parse(response.body)
  rescue *NETWORK_ERRORS
    retry if (attempts += 1) <  MAX_RETRIES # Retry mechanism
  end
end
NOTE: A non ActiveRecord class in the models?!
Yes, and it’s okay. Read some gems, and you will notice that people do it. You don’t necessarily need everything to be in a Service namespace.
How does it works in this blog?
Well, this blog is not in Rails.
It’s statically generated using gohugo.io with minimal JavaScript.
And I use Cloudflare Workers when I need a backend call, because it’s free and sufficient.
In my case, this is what I’m doing:
  <!-- Rest of the form... -->
  <div class="cf-turnstile flex justify-center" data-sitekey="my_public_key"
    data-callback="turnstileCallback">
  </div>
  <!-- Rest of the form... -->
NOTE:
turnstileCallbackcan be used will be used in the stimulus controller.
import { Controller } from "@hotwired/stimulus"

export default class extends Controller {
  static targets = ["email", "fields", "thankyou", "submit"]

  connect() {
    // Setting variables

    window.turnstileCallback = (token) => {
      this.token = token
      this.fieldsTarget.classList.remove("hidden")
    }
  }

  onChange(event) {
    // More ui logic
  }

  async submit(event) {
    event.preventDefault()
    if (this.emailTarget.value) {
      await fetch(this.url, {
        cors: "no-cors",
        method: "POST",
        headers: {
          "Content-Type": "application/json",
        },
        body: JSON.stringify({
          // rest of the payload
          token: this.token
        }),
      });

      // More ui logic
    } else {
      alert("Enter your email first ;)")
    }

  }
}
NOTE: The follwing code is in a cloudflare worker.
// Worker config above..

app.post('/api/leads', async c => {
	// Database logic here...

	const url = 'https://challenges.cloudflare.com/turnstile/v0/siteverify';
	const result = await fetch(url, {
		body: formData,
		method: 'POST',
	});

	const outcome = await result.json();

	if (!outcome.success) {
		c.status(422)
		console.log("NOOP")
		return c.text("No monsieurs")
	}

	// Proceed with database logic here...
})

export default app
Same achitecture different execution.
Conclusion
One of the cool things about turnstile is that it gives you extra data to understand user behavior:
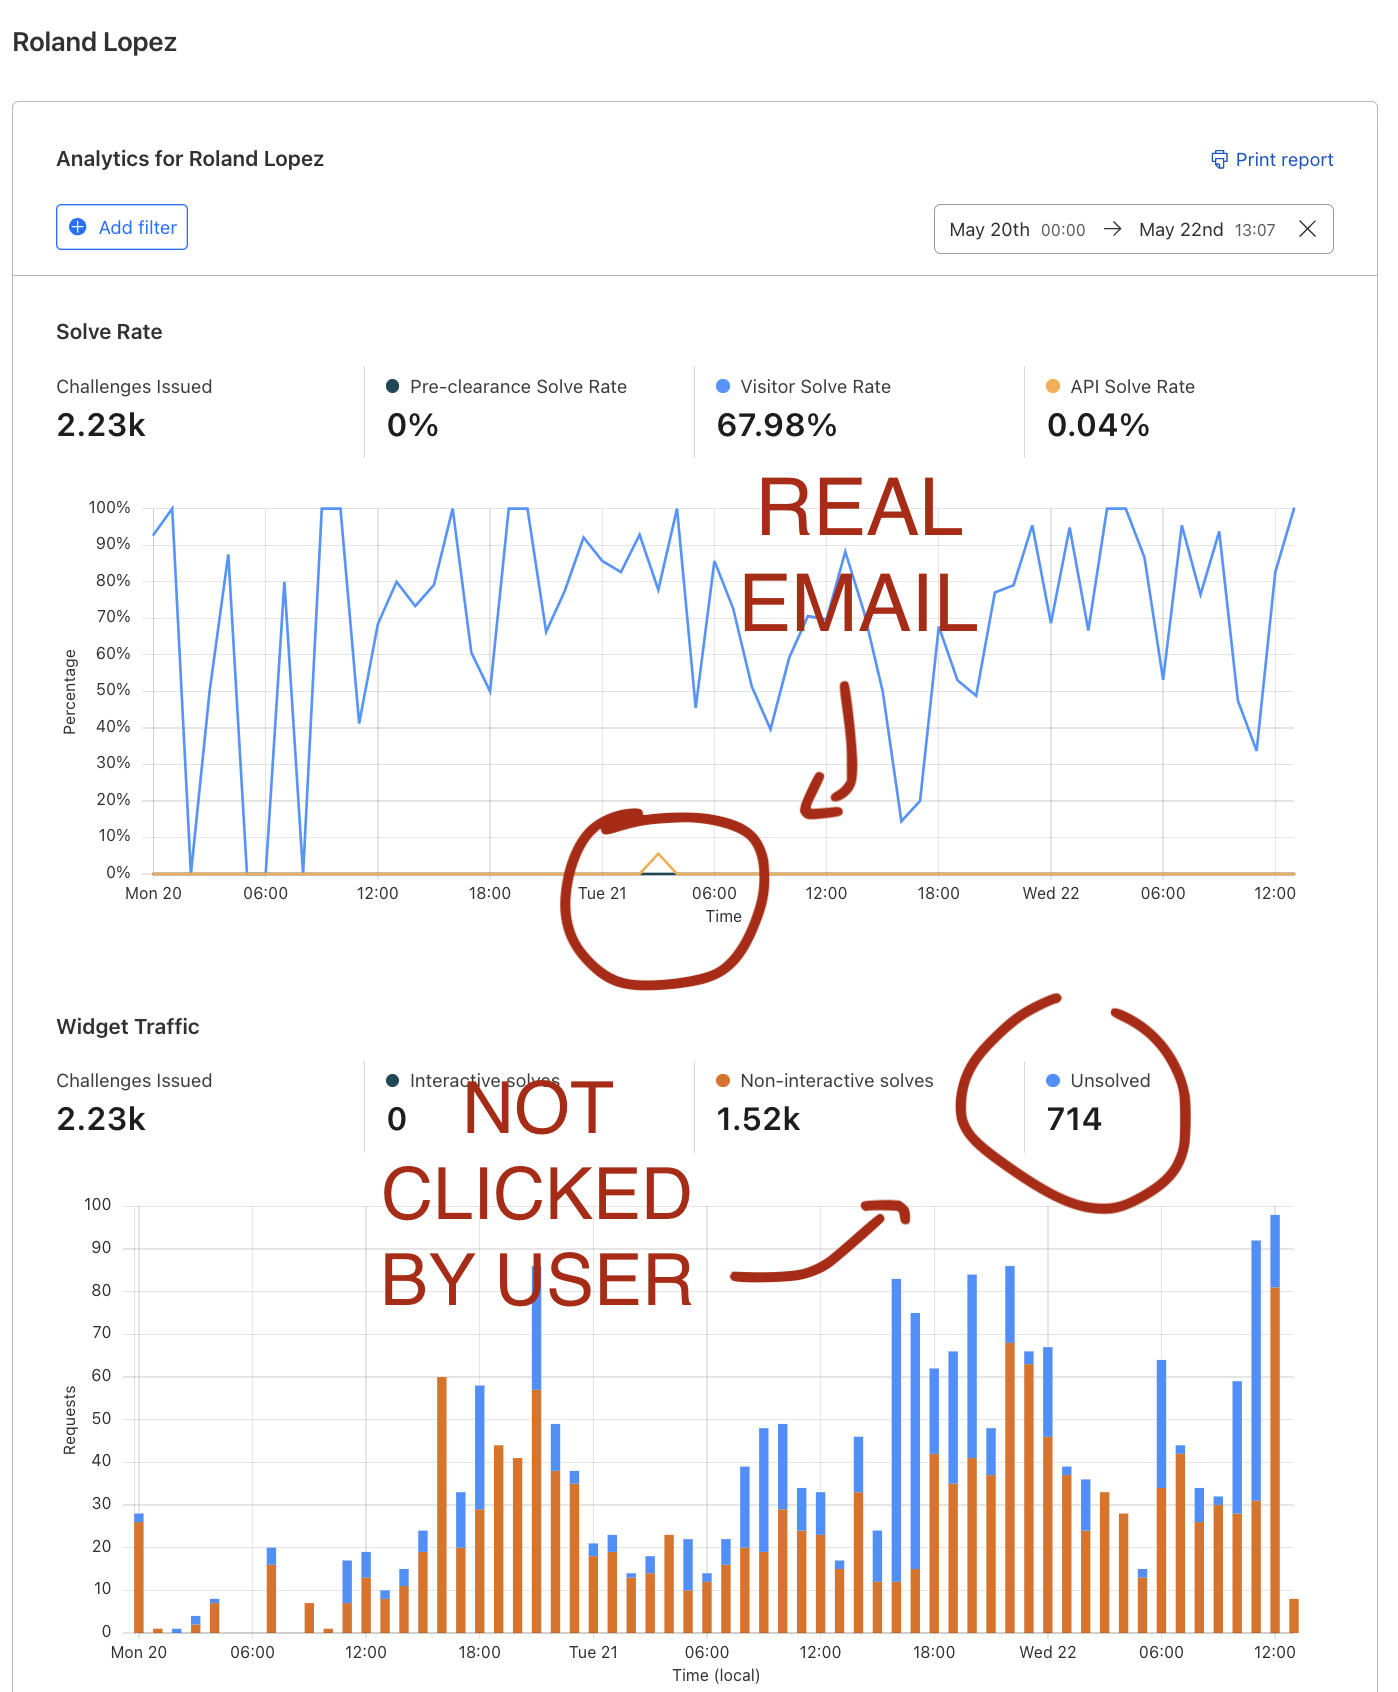
This help you see who much cheating is happening in your lead collector and make sure you collect quality emails for your sales and marketing pipelines.
Alright, your turn, enter your email to prove me that you are not an AI bot 😂
Roland 🤠